
There are numerous methods that have been developed for working with ion exchange materials. In this blog post, we will describe a few basic methods commonly used in ion exchange research to help a student or new scientist to work with these materials.
Storage of Ion Exchange Materials
In my previous blog posts, we have discussed the importance of hydration on ion exchange materials (IEMs). Due to this property, IEMs are unstable when they are dried and usually an experiment cannot be performed, or a system assembled when the IEM is in a dried state. Depending on material type, it is recommended that the IEM be stored in a water saturated or semi-saturated state. Many laboratories have humidity-controlled storage spaces, and this type of space may be ideal to ensure a consistent water content. This is especially true for anion exchange materials (AEMs), which are more stable in the salt forms (such as Cl- form).
Initial Treatment
Many types of ion exchange membranes are supplied and/or stored in the dry form. This means that the material needs to be hydrated prior to use. A scientist that is new to using IEMs may not realize this and put dry material into their system or prototype. Prior to using an IEM, the material must be treated or “swelled.” The swelling procedure often consists of using a type of solution with an acid, base, or salt, depending upon the material type and end use application. The material may need to sit in the aqueous solution for one to several hours and then washed with water. If required, the material may also need to be treated to convert it to the ionic form. There are also some newer materials that do not require this treatment. However, when trying a new ionic material, the steps for storage and treatment must be considered.
Conditioning
Often IEMs may be supplied in a “ready to use” form but that does not mean they are necessarily ready to implement in your experiment or prototype. Certain applications require strict control of the ion transfer process and others have more flexible requirements – such as materials used for the determination of chemical and physico-chemical characteristics. Some of issues that can occur when using fresh ion exchange materials for precise experiments are:
- Impurities with different ions than the declared ionic form.
- Impurities due to the monomer and cross-linking agent in the synthetic procedure.
- Presence of crosslink “knots” or weak crosslinks in the polymeric matrix.
When the IEM is synthesized, both chemical and physical cross-linking occurs in random locations that are favorable to the synthesis process. In addition, the water saturation process and swelling may be different, and may be repeatedly changed due to the difference in end use applications. Due to these differences, the cross-links may not be able to sustain the repeated swelling variations and break down. Therefore, the elastic properties may be different with a fresh membrane compared with a membrane after a few ion exchange cycles.
To help avoid this issue from occurring, the materials will be conditioned prior to performing experiments that require precision. For many materials, this may consist of a treatment that alternates NaOH and HCl. The mechanical breakdown of cross-links can be expected when the material changes environments with different pHs. In this case, a gradual concentration change needs to be applied. An example of a material treatment with Fe3+ ions is:
- Soak material in a concentrated solution of NaCl and rinse with water.
- Treat with HCl, and increase the molarity slowly (i.e., 0.5 M, 1 M).
- Treat with 3 M HCl until there is an absence of Fe3+ in the effluent, then decrease HCl concentration (i.e., 1 M, 0.5 M) and wash with water.
- Treat with an increasing concentration of NaOH (i.e., 0.1 M, 0.5 M, 1M) and then wash with water.
- Treat with an increasing concentration of HCl (i.e., 0.5 M, 1M) and then wash with water.
- Steps 4 and 5 may need to be repeated.
- Convert to the material to the desired ionic form with a 0.1 – 1 M solution of a suitable substance.
The pH and ion concentration should be monitored throughout the process to verify the completeness of the ionic form conversion.
For certain AEMs, the hydroxyl form can rapidly consume carbon dioxide from the environment. Therefore, storage of OH- forms of these materials are tough, even in CO2 protected environments. Therefore, the conversion of the AEM to an OH- form must be completed prior to performing the experimental procedures.
Water Content
The water content of dry ion exchange materials is extremely sensitive to the humidity in the air and can change within hours if placed into an environment with a different level of humidity. Therefore, many material tests have to take into consideration the water content of the material. If the material needs to be dried for a particular type of material test, it can be dried using elevated temperature or drying agents. The temperature selected for drying is dependent upon the thermal stability of the material. An example drying procedure is noted below:
- Material samples are weighed and then placed in a glass container with a tight lid or rubber stopper. The container is weighted with a 0.2 mg precision.
- The container is placed in a pre-heated drying oven. Stoppers are removed and kept in the same oven.
- The samples are dried at 100 - 110 ˚C for 24 hours depending upon the type of material. If the material has a lower thermal stability, they can be dried between 50 – 70 ˚C under vacuum.
- Upon opening the oven, the lid or stopper is replaced, and then placed in a desiccator while cooling to room temperature.
- Containers with samples are weighed again. The drying procedure may need to be repeated several times with a minimum drying time of 4 hours. Once the weight reduction between two drying steps is less than 0.4 mg, then the drying is completed.
Mechanical Stability
The IEM can be examined visually to determine certain material properties such as the absence of fractures, cavities, and shape. A microscope can be used to examine the effect of increasing the mechanical pressure to determine when irreversible material deformation or fracture occurs. There are many types of visual analysis, including optical microscopy and scanning electron microscopy (SEM). Performing materials characterization is helpful for understanding IEMs that are installed in environments under high pressure.
SEM produces high-resolution images of a sample surface. It creates the magnified images by using electrons instead of light waves. Samples have to be prepared carefully to withstand the vacuum inside the microscope. SEM images have a 3-D structure and are useful for determining the surface structure of the sample. When analyzing a sample using SEM, the user needs to make sure that the region analyzed is characteristic of the entire sample since the field of view is very small.
Density
The density of IEMs can be determined using a mercury pycnometer. When using this method, the value will represent the ration of the weight and the volume of the dense parts of the polymer network and the pores because the mercury cannot penetrate into the pore structure of the material. A helium pycnometer can be used to measure the density of the polymeric network because the helium can penetrate the pores. An example procedure for density determination is as follows:
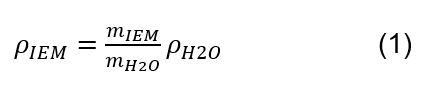
- Determine the weight of empty, dry pycnometer m0. Fill the pycnometer with distilled water and measure the weight (mH2O).
- Empty pycnometer and let dry.
- Fill pycnometer with the material and measure the weight (mIEM).
- Measure the laboratory temperature (T).
- Calculate the weight of water, weight of the material, and determine density of the material (ρIEM) according to the following equation:
Porosity
The porosity of a material is the ratio of void space to the total volume of the material. Porosity can be determined using several one of several methods. The pore structure can be characterized using penetration of organic dyes, BET equipment, Scanning Electron Microscopy (SEM) microscope, or a mercury porosimetry.
Mercury porosimetry can be used to determine pore size. The porous sample is placed in a chamber that is evacuated, and mercury is injected into the porous sample. The pressure is extremely low at first, and then it is steadily increased, and the volume at each pressure is recorded. Mercury will enter the pore radius r only when the pressure p in the chamber is:
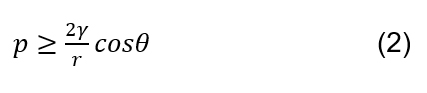
where ɣ is the surface tension of mercury and θ is the contact angle of mercury. Using this equation, the experimental mercury pressure data allows pore size curves to be calculated.
Brunauer-Emmett-Teller (BET) equipment can be used to measure the square of the pore surface. The ratio of the pore surface and the volume can be used to estimate pore size and direct measurements can be performed to characterize the pore size distribution. The BET method uses absorbs an inert gas, such as nitrogen, argon, or krypton, to absorb on the sample surface at low temperatures. The typical test consists of evacuating a dry sample of all gas, and cooling it to 77 K. A layer of inert gas will physically adhere to the sample surface, which lowers the pressure in the chamber. The surface area of the sample can be calculated from the measured absorption isotherm.
Water Vapor Sorption Isotherms
The amount of water in an IEM can be characterized using a water vapor sorption isotherm. A simple method for determining the water vapor activity (P/P0) is as follows:
- A sample of air-dried material is placed into a dry weighed glass containers with an airtight glass stopper. The container is weighted with a 0.2 mg precision.
- A series of desiccators with saturated solutions of pure inorganic salts must be prepared. There are numerous types of salts that can be used for this purpose including NaCl, KBr, ZnSO4, KNO3, etc.
- Containers with the material samples are placed into the desiccators. Stoppers are removed and kept in the same desiccator.
- The material samples should be exposed to the enclosed atmosphere for days or weeks, depending upon the size of the desiccators and material samples.
- Recirculation of the atmosphere inside the desiccator could reduce the amount of experimental time.
- Upon opening the desiccator, the container is covered with a stopper and weighed again.
- The procedure may need to be repeated several times. Once the weight drift is less than 0.4 mg, then the process is completed.
- The water content in each sample is calculated from the difference between the weights of the air-dry material and the pressures in the desiccator before and after the material equilibrated with the salt vapors (P/P0).
Conclusion
The purpose of this blog post was to introduce common storage, treatment, and characterization techniques for polymer-based ion exchange materials. The specific treatment and characterization options depend upon the material type, crosslinking network, and end-use applications.
 Posted by
Dr. Colleen Spiegel
Posted by
Dr. Colleen Spiegel
Dr. Colleen Spiegel is a mathematical modeling and technical writing consultant (President of SEMSCIO) and Professor holding a Ph.D. and an MSc degree in Engineering. She has seventeen years of experience in engineering, statistics, data science, research & technical writing work for many companies as a consultant, employee, and independent business owner. She is the author of ‘Designing and Building Fuel Cells’ (McGraw-Hill, 2007) and ‘PEM Fuel Cell Modeling and Simulation Using MATLAB’ (Elsevier Science, 2008). She previously owned Clean Fuel Cell Energy, LLC, which was a fuel cell organization that served scientists, engineers, and professors world-wide.


Enter the code in the box below: